ASP.NET Web Forms ile Web API kullanma


tarafından Mike Wasson
ASP.NET Web API, ASP.NET MVC ile paketlenmiştir olsa da, Web API'si için geleneksel bir ASP.NET Web Forms uygulaması eklemek kolay bir işlemdir. Bu öğreticide, adım adım açıklanmaktadır.
Genel Bakış
Bir Web Forms uygulaması'nda Web API'sini kullanmak için iki ana adım vardır:
- Türetilen bir Web API denetleyicisi ekleme ApiController sınıfı.
- Bir rota tablosuna ekleme uygulama_Başlat yöntemi.
Web Forms projesi oluşturun
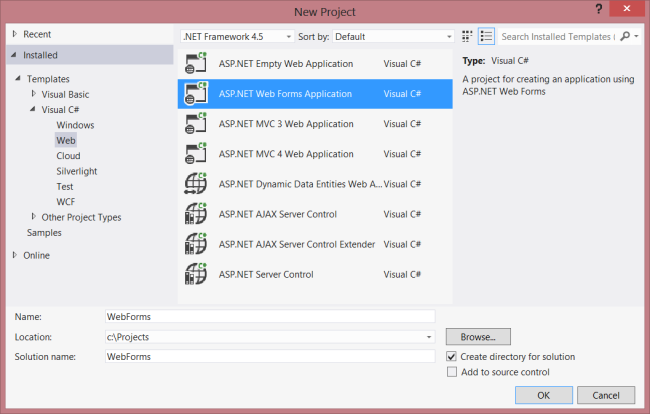
Visual Studio'yu başlatın ve seçin yeni proje gelen Başlat sayfası. Veya dosya menüsünde yeni ardından proje.
İçinde şablonları bölmesinde yüklü şablonlar genişletin Visual C# düğümü. Altında Visual C# seçin Web. Proje şablonları listesinde seçin ASP.NET Web Forms uygulaması. Proje için bir ad girin ve tıklayın Tamam.
Model ve denetleyici oluşturma
Bu öğreticide aynı model ve denetleyici sınıflar olarak Başlarken öğretici.
İlk olarak, bir model sınıfı ekleyin. İçinde Çözüm Gezgini, projeye sağ tıklayıp seçin sınıfı Ekle. ' % S'sınıfı ürün adı ve aşağıdaki uygulama ekleyin:
C#
public class Product
{
    public int Id { get; set; }
    public string Name { get; set; }
    public decimal Price { get; set; }
    public string Category { get; set; }
}
Ardından, bir Web API denetleyicisi proje, A ekleyin. denetleyicisi Web API'si için HTTP isteklerini işleyen nesne.
İçinde Çözüm Gezgini, projeye sağ tıklayın. Seçin Add New Item.
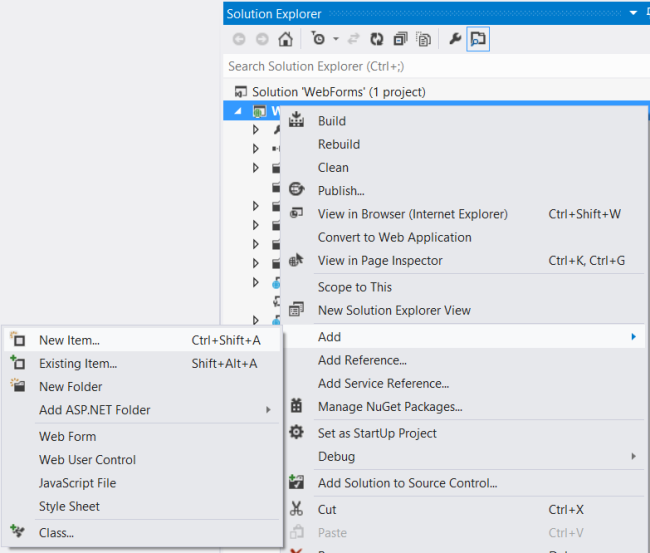
Altında yüklü şablonlar, genişletme Visual C# seçip Web. Şablonlar listesinden seçip Web API denetleyici sınıfı.Denetleyici "ProductsController" adını verin ve tıklayın Ekle.

Yeni Öğe Ekle Sihirbazı ProductsController.cs adlı bir dosya oluşturur. Sihirbaz dahil yöntemleri silin ve aşağıdaki yöntemleri ekleyin:
C#
namespace WebForms
{
    using System;
    using System.Collections.Generic;
    using System.Linq;
    using System.Net;
    using System.Net.Http;
    using System.Web.Http;

    public class ProductsController : ApiController
    {

        Product[] products = new Product[]
        {
            new Product { Id = 1, Name = "Tomato Soup", Category = "Groceries", Price = 1 },
            new Product { Id = 2, Name = "Yo-yo", Category = "Toys", Price = 3.75M },
            new Product { Id = 3, Name = "Hammer", Category = "Hardware", Price = 16.99M }
        };

        public IEnumerable<Product> GetAllProducts()
        {
            return products;
        }

        public Product GetProductById(int id)
        {
            var product = products.FirstOrDefault((p) => p.Id == id);
            if (product == null)
            {
                throw new HttpResponseException(HttpStatusCode.NotFound);
            }
            return product;
        }

        public IEnumerable<Product> GetProductsByCategory(string category)
        {
            return products.Where(
                (p) => string.Equals(p.Category, category,
                    StringComparison.OrdinalIgnoreCase));
        }
    }
}
Bu denetleyicideki kod hakkında daha fazla bilgi için bkz. Başlarken öğretici.
Yönlendirme bilgileri
Ardından, URI yolu şekilde ekleyeceğiz, bir URI'leri formun "/API'si/ürünler/" denetleyiciye yönlendirilir.
İçinde Çözüm Gezgini, Global.asax Global.asax.cs arka plan kod dosyasını açmak için çift tıklayın. Aşağıdaki kullanarak deyimi.
C#
using System.Web.Http;
Ardından aşağıdaki kodu ekleyin uygulama_Başlat yöntemi:
C#
RouteTable.Routes.MapHttpRoute(
    name: "DefaultApi",
    routeTemplate: "api/{controller}/{id}",
    defaults: new { id = System.Web.Http.RouteParameter.Optional }
);
Yönlendirme tabloları hakkında daha fazla bilgi için bkz. ASP.NET Web API'de yönlendirme.
İstemci tarafı AJAX ekleme
Tüm web istemcilerin erişebileceği bir API oluşturmak için gereken budur. Şimdi, API'yi çağırmak için jQuery kullanan bir HTML sayfası ekleyelim.
Ana sayfanıza emin olun (örneğin, Site.Master) içeren bir
ContentPlaceHolder ile ID="HeadContent":
HTML
<asp:ContentPlaceHolder runat="server" ID="HeadContent"></asp:ContentPlaceHolder>
Default.aspx dosyasını açın. Ana içerik bölümü Demirbaş metni gösterildiği gibi değiştirin:
aspx
<%@ Page Title="Home Page" Language="C#" MasterPageFile="~/Site.Master"
    AutoEventWireup="true" CodeBehind="Default.aspx.cs" Inherits="WebForms._Default" %>

<asp:Content ID="HeaderContent" runat="server" ContentPlaceHolderID="HeadContent">
</asp:Content>

<asp:Content ID="BodyContent" runat="server" ContentPlaceHolderID="MainContent">
    <h2>Products</h2>
    <table>
    <thead>
        <tr><th>Name</th><th>Price</th></tr>
    </thead>
    <tbody id="products">
    </tbody>
    </table>
</asp:Content>
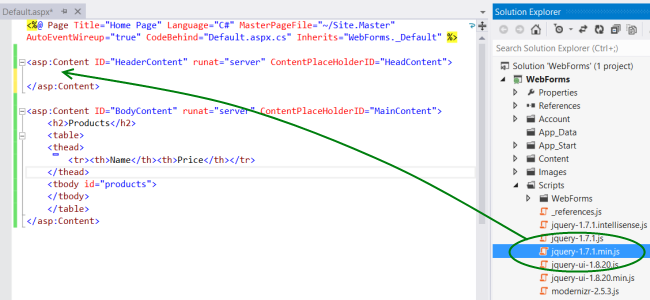
Ardından, jQuery kaynak dosyasına bir başvuru ekleyin
HeaderContent bölümü:
aspx
<asp:Content ID="HeaderContent" runat="server" ContentPlaceHolderID="HeadContent">
    <script src="Scripts/jquery-1.10.2.min.js" type="text/javascript"></script>
</asp:Content>
Not: Kolayca betik başvurusu dosyasından sürükleyip bırakarak ekleyebilirsiniz Çözüm Gezgini içine kod düzenleyicisi penceresi.
Aşağıdaki komut dosyası bloğu jQuery komut dosyası etiketi ekleyin:
HTML
<script type="text/javascript">
    function getProducts() {
        $.getJSON("api/products",
            function (data) {
                $('#products').empty(); // Clear the table body.

                // Loop through the list of products.
                $.each(data, function (key, val) {
                    // Add a table row for the product.
                    var row = '<td>' + val.Name + '</td><td>' + val.Price + '</td>';
                    $('<tr/>', { html: row })  // Append the name.
                        .appendTo($('#products'));
                });
            });
        }

        $(document).ready(getProducts);
</script>
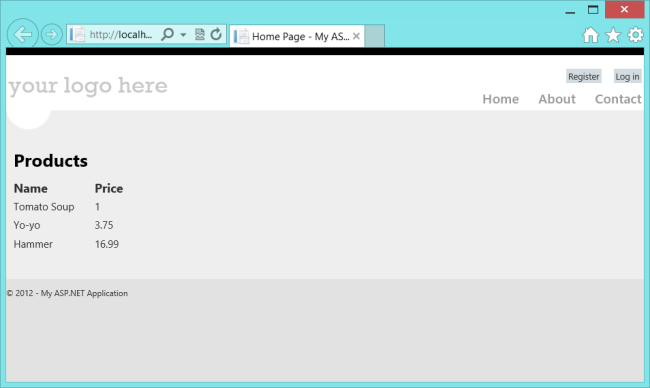
Belge yüklendiğinde bu betik bir AJAX isteğinde bulunur. "API/ürünleri". İstek, JSON biçiminde ürünlerin listesini döndürür. Betik, ürün bilgisi HTML tablosuna ekler.
Uygulamayı çalıştırdığınızda, şu şekilde görünmelidir:

Hiç yorum yok:
Yorum Gönder